Precision CNC turning services usually start by having engineers concentrate their efforts on choosing the proper knurling tools before ending up with failed patterns, tolerance problems in radial dimensions, and even cracks in parts due to high volume production runs. The underlying problem is the general lack of material rheology control that causes suppliers to be unable to compute knurl wheel extrusion pressure and feeds for certain types of metal such as 303 stainless steel and 7075 aluminum alloy, making the part either dysfunctional or aesthetically unacceptable.
With the incorporation of precision CNC turning processes with cut knurling, LS Manufacturing guarantees consistent texture performance while keeping the tolerance for wall thickness at ±0.015mm. In the coming sections, you will be informed of our engineering solutions for addressing such production difficulties involving CNC turned parts.

Precision CNC Turning: Specialized Knurling For Enhanced Functionality
| Functional Goal | Knurling Challenge | Our Specialized Process | Performance Outcome |
| Ergonomic Grip | Sliding, slippery surfaces on handles, knobs, and dials. | Diamond or Straight Knurling Pattern: Adds microscopic textures to increase the friction and feedback. | More user control and safety, including when gripping with wet hands or gloves. |
| Press-Fit Retention | Vibration and thermal expansion causing assemblies to become loose. | Precision Form Knurling: Material is displaced to increase the outer diameter to create interference fit. | Increase joint strength without adhesives, perfect for pins and bearings. |
| Aesthetic Branding | Generic appearance of CNC turning components facing consumers. | Custom Pitch and Angles Tooling: Tuning the number of teeth per inch and angles of knurls to achieve better looks and feeling. | Professional and distinctive look, enhancing perceived quality. |
| Material Integrity | Material breakdown or flaking of hard and brittle materials. | Cut Knurling (Hard Materials) : Removal of material rather than displacement, to avoid stress fracture in alloys higher than 45 HRC. | Clean, crisp patterns on tooling and high strength components. |
| Dimensional Accuracy | Knurling process resulting in distortion of critical diameters. | CNC Controlled Depth: Control of roller pressure and feed rate to hold critical diameters to within ±0.05mm. | Texture enhancement while not compromising dimensional integrity. |
| High-Volume Consistency | Includes pattern skipping, double tracking, or wear inconsistencies. | Self-Centering Collet Chucks: Automatic centering along with consistent force delivery through the manufacturing process. | Capable of maintaining high batch consistency with virtually no scrap caused by knurling issues. |
We provide CNC turning solutions for the problem of adding functionality and texture to products without losing control of precision. Our specific knurling procedures improve the performance aspects of turned products, such as better gripping, assembly, and appearance. We will ensure that your components will be easy to use, securely assembled, and accurate in dimension and finish quality.
Why Trust This Guide? Practical Experience From LS Manufacturing Experts
There are numerous articles on knurling on the internet. What distinguishes this article from others? We are people of action, not theory. All suggestions made in this document are based on practical experience obtained during the provision of precision CNC turning services. Each solution offered comes from the practical solution of engineering problems, which requires parts to withstand strain and provide a reliable grip and is based on requirements set forth by ASTM International.
In our workshop, we deal with materials as rigid as 303 stainless steel to as flexible as 6061 aluminum, and using the wrong pressure will ruin not just its shape but its function as well. We understand that a different method is used to knurling a handle for surgery compared to one made for use in aerospace equipment. In every project we do according to specifications provided by the Aluminium Association (AAC), among others, we learn to control material flow in order to produce flawless and durable diamonds and straight lines without altering the fundamental character of the part.
We provide advice based on coolant, chips, and statistics. Our experience with ensuring that knurled connectors fit tightly, with no slipping from textured grips, and that diameters lie within tolerances of ±0.015mm makes us understand what must be done to combine aesthetics and functionality. This is all achieved by optimizing feed rate, wheel geometry, and durability validation.
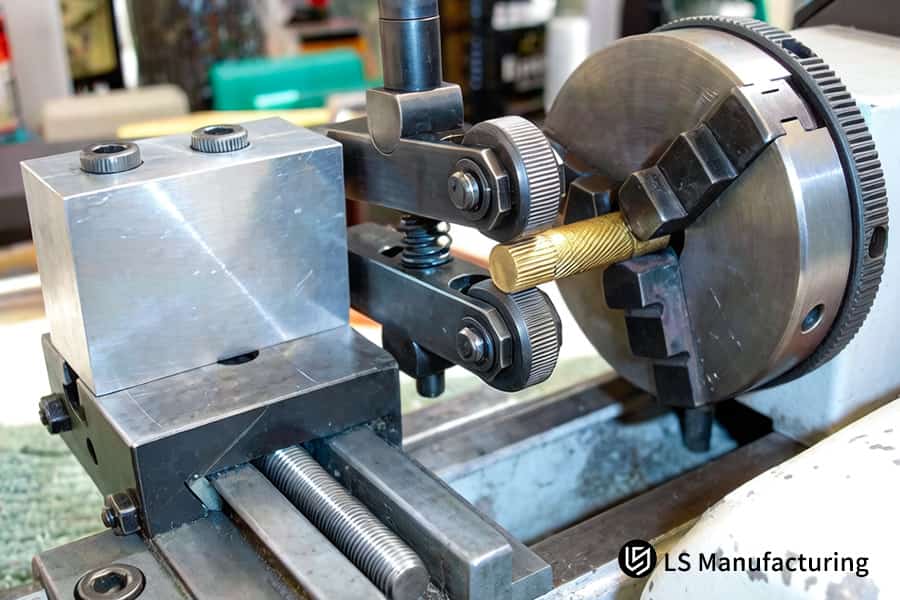
Figure 1: Applying a crosshatch knurl to a brass workpiece for tactile grip in consumer electronics dials and switches.
Why Are Precision CNC Turning Services Critical For High Torque Handle Components In 2026?
For handles requiring large torques, force delivery depends on an engineering feat of form and surface design. This section explores how we address the problem of guaranteeing a solid grip through our proficiency in the CNC handle turning process to precisely design and control the knurl geometry as follows:
Material Selection for Controlled Flow
Starting off, we opt for alloys that deform easily within expected bounds, not only that they are machinable. The selected materials go through conditioning before they flow perfectly under the knurl wheel to produce sharp texture roots without weakening the core of the custom metal parts.
Geometric Optimization of the Knurl Pattern
Going further, we step away from conventional designs to create digital models of particular diamond angles and pitch for an intended static friction coefficient to for torque enhancement. Our precision CNC turning services cater to this need by delivering customized geometries consistently through production CNC turning batches.
Closed-Loop Process Control
The attainment of the required specifications in tactile and mechanical properties necessitates that the depth and distance between each ridge be kept within ±0.02mm. The use of tool pressure measurements and adaptive feed control on the industrial CNC turning process will ensure that we avoid the problems arising from under-formation (slippage) or over-formation (stress concentration), such that all handles produced meet their requirements.
Validation via Application-Specific Testing
In addition to measuring the dimensional properties, the validation process involves subjecting the samples to cycles of torque measurement and analysis. The information obtained in terms of performance is directly incorporated into our CNC turning services settings to ensure consistency and accuracy in performance.
Through this discussion, we have demonstrated that dependable torque enhancement through knurling requires the input of engineering expertise. This document offers specifics on how this feat is achieved through careful analysis of alloy behavior, tooling, and design process. It offers a technical blueprint for achieving perfection in the manufacture of custom metal parts.

How Can Specialized Knurling Processes Solve Interference Fit Failures In Complex Aerospace Assemblies?
Failed interference fits in aerospace assemblies pose the threat of component loosening or hub cracking. LS Manufacturing’s approach changes knurling from a surface finish technique into a dimensionally controlled compensation process, providing 100% first-time assembly for aerospace components and ensuring a reduction of COQ while removing the scrap of fit problems:
Predictive Dimensional Analysis
- Method: Pressure compensation modeling specific for material type.
- Technical Action: Determination of Expansion Rate per alloy, such as 7075-T6 aluminum and 17-4PH SS, for the post-knurl diameter modeling.
- Engineering Outcome: The analysis determines the exact diameter of the knurled component before knurling that is performed through our precision kathe turning services to ensure the right post-knurl interference.
Compensated Process Execution
- Method: Dynamically controlled specialized knurling processes.
- Technical Action: Execution of the operation using our dedicated CNC turning machines with control of the tool pressure and feed in relation to the material behavior model.
- Engineering Outcome: The process provides accurate displacement, leading to high precision fits for precision shaft turning and bushing turning processes.
Validation & Closed-Loop Calibration
- Method: Post-processing measurement and integration of Statistical Process Control (SPC).
- Technical Action: Dimensional measurement of parts and correlation analysis of data acquired with pre-processing predictive models for each batch in our tight tolerance shaft turning operation.
- Engineering Outcome: Ensures uniformity of dimensional accuracy and fit quality in complex CNC turning operations by creating a feedback loop to proactively prevent cost of quality (COQ).
This report describes the exact design process that is needed to make sure no guesswork is involved, with guaranteed success. It involves predictive analysis and precision CNC turning services, followed by validation and setting the technical standard of reliable interference fits. With this degree of detailed information, an ordinary process becomes an engineering approach capable of delivering flawless assemblies in aerospace components.
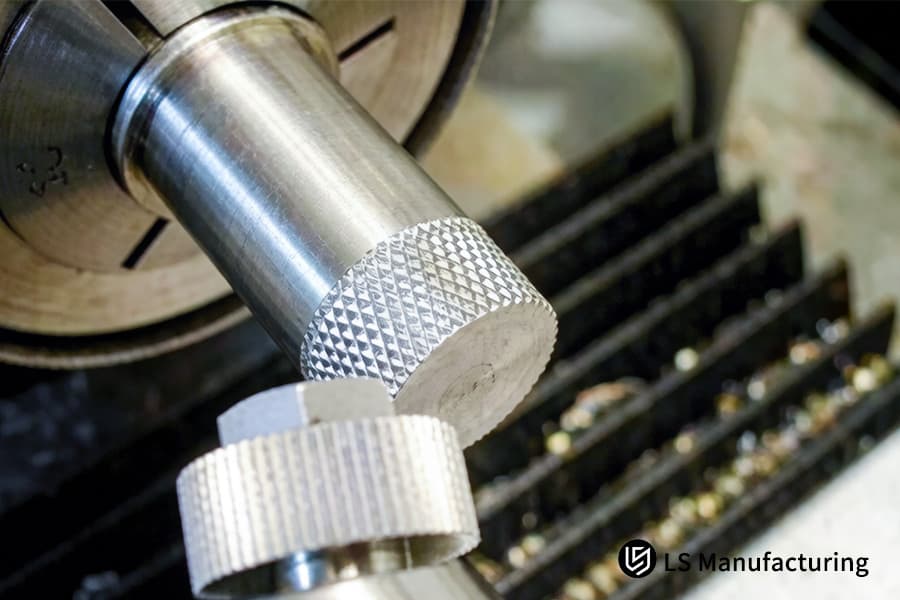
Figure 2: Machining a straight knurl pattern onto a 304 stainless cylinder for medical device adjustment dials.
Why Do Elite Engineers Prioritize CNC Knurling Services For Aesthetic Consumer Electronics Housings?
Top-tier consumer electronics gadgets require a luxurious appearance and high functionality from their enclosure, a feat that requires more than mere surface finish but rather an innovative surface finish design. This report explains how a precision manufacturing technique makes use of CNC knurling services to solve the challenging issues of invisible joints and thermal conductivity in luxurious electronics gadgets.
| Aspect | Our Technical Approach & Solution |
| Process Selection | We apply a cutting approach for knurling rather than forming because it is a material removing process and results in visible textures on the surface, which is Ra 0.8 μm or higher. |
| Seamless Appearance | Seamless appearance is guaranteed by multi-axis CNC turning machine tools, which have coordinated movements along the Y axis and the main spindle. |
| Functional Integrity | No compression takes place while doing cut knurling, hence, preserving the heat transfer ability and other functional attributes of the material. |
| Precision & Control | Knurling for CNC turning takes place using programmed technique in the machining process, ensuring micro-level accuracy in patterning even when doing mass production. |
This methodology describes in detail how to achieve seamless integration and prevent material degradation, which is often a common challenge during aesthetic finishing operations. We explain here exactly what is entailed from precision CNC turning services to the application of cut knurling, leading to perfect finishes that satisfy all requirements. This is the standard expected in precision manufacturing in the making of enclosures through complex enclosure turning.
Can Precision Kathe turning services achieve micron level consistency in mass production batches?
The achievement of micron tolerance accuracy and its proper management within mass production processes represent the pinnacle of control in manufacturing. The document enclosed herein will illustrate the manner through which we have managed to utilize our advanced closed loop manufacturing technology to attain reliable machining accuracy within our high precision CNC turning operations.
Real-Time Tool Condition Monitoring
The basic concept behind our advanced manufacturing process lies in the real-time monitoring of the condition of the knurl wheel and parameters of the cutting tool. The values of forces, vibrations, and acoustic emissions during each precision shaft turning process cycle are monitored in real-time. These values are then cross-checked against our golden standard in order to identify any potential deviation or degradation in tool performance well ahead of exceeding the tolerance limits.
Automated In-Cycle Compensation
If it detects that the drift is moving toward the tolerance limits, the system triggers the compensation process right within the ongoing shaft turning. Therefore, thanks to our precision kathe turning services, your manufacturing will have real-time adjustment of the feeds and cuts to maintain constant forming pressure and geometry. That way, you will obtain the same quality in the critical dimensions such as ≤0.01 mm run-out from the very first manufactured part to the ten-thousandth.
Data-Locked Process Validation
All data on all the values obtained and the outcomes are recorded in every building run. The data is analyzed for future use in predictive maintenance and the formulation of "lockable" process recipe for all high-volume component turning projects. This is done so as to ensure that our mass production becomes an optimized system, thereby guaranteeing us that all batches have been produced at a standard similar to that of the first batch.
Here is how the engineering process ensures that the consistency control is achieved. The detailed methodology for implementing the consistency control is described in the documentation, which involves monitoring, sensor-based control, and process locking using validated data. Thus, the engineering process becomes indispensable for guaranteeing that our high precision CNC turning will provide you with the desired consistency of quality.
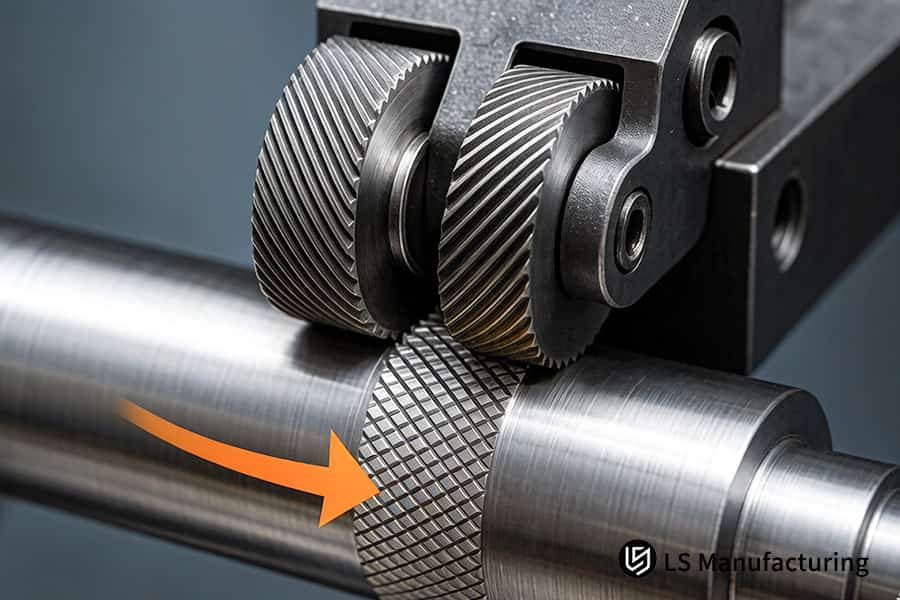
Figure 3: Pressing knurl wheels against a rotating shaft to create a grip surface for industrial valve handles.
How Does Knurling For CNC Turning Mitigate The Risk Of Stress Corrosion In Offshore Equipment?
In the harsh conditions of offshore engineering, the durability of machined parts is severely tested by stress corrosion cracking (SCC). In this document, we outline our strategic approach that aims to address SCC directly through optimized knurling for CNC turning. The key to solving this problem is to preserve the natural corrosion resistance of the material throughout the process. The process ensures final CNC turning for part functionality and component reliability.
Proactive Preservation of the Passive Layer Integrity
- Challenge: Traditional knurling tears apart and fractures the passive film layer made of chromium oxide.
- Our Approach: We consider the knurl as a final cold-forming step.
- Pre-Process Surface Conditioning: A specific finishing pass prepares the surface for cold forming.
- Toolpath Geometry Strategy: We design a tangential toolpath that prevents tearing the passive film layer.
- Outcome: Post-process, we maintain an intact work-hardened passive film layer.
Management of Residual Stress Profiles through Controlled Deformation
- Direct Cause of SCC: Subsurface tensile stresses act as anodic sites in a chloride environment.
- Our Solution: Convert the knurling process so as to produce desirable compressive stress conditions.
- Precision Radial Infeed Control: Controls the depth of plastic deformation through CNC turning parameters optimization.
- Optimized Material Work-Hardening: Leverages the behavior of the material itself to toughen the surface.
- Verification: X-ray analysis post-processing confirms the presence of compression.
Chemistry-Mediated Process: Specialized Cutting Fluid Formulation
- Standard Fluids' Role: Used for cooling purposes and removal of chips; reactive with new surfaces of metals.
- Our Developed Formulation: An oxygen-absorbing formula with organic inhibitors to prevent corrosion.
- Function: Creates a transient protective film during the CNC turning finishing process, preventing instantaneous oxidation.
Synchronization of Kinematic Parameters for Predictable Outcomes
- Interdependent Variables: The parameters of speed, feed, and tooling materials cannot be determined independent of one another.
- Decision Process: An optimal decision matrix is devised where the balance between minimizing heat production and maximizing the volume of metal being processed is achieved for all types of alloys.
- Closed-Loop Process Control: CNC turning process control involves controlling surface speed and synchronization of machine axes to ensure uniform deformation without developing any local stresses.
The methodology elevates a regular finishing process into a highly technical surface preparation activity. The strength of the technique lies in its physics-based methodology, which successfully converts corrosion theory into a viable manufacturing specification. We are confident that the application of this methodology to our complex CNC turning operations will result in concrete performance enhancements for our vital offshore parts, targeting their core problem areas.
Why Is CNC Turning For Part Functionality The Best Approach For Customized Sensor Housing Designs?
The design of advanced sensor housings is characterized by extremely thin walls and texture functionalities. For successful CNC turning for part functionality in this case, there must be an innovative DFM optimization. Our method involves an active DFM optimization methodology through the use of custom-designed support tooling during advanced CNC turning.
| Aspect | Our Technical Approach |
| Primary Challenge | Pressures generated in knurling operations cause failure in thin wall parts (<1.0mm) in conventional machining operations. |
| Core Solution | An internally expanding mandrel, with several segments, offers support all around the sensitive sensor housing in the finishing process. |
| DFM Integration Point | The design is optimized during prototyping as an important milestone in our DFM optimization process. |
| Machining Process | The machining process requires only one cycle due to our precision CNC turning services, with support from the mandrel throughout the machining process |
| Process Enabler | This process is possible due to specialized CNC turning process development for challenging thin wall applications. |
| Quantified Outcome | The approach guarantees no deformations, allowing creation of features with thin walls as small as 0.8mm and concentricity under 0.025mm. |
| Added Value | Our approach ensures reliable CNC turning for part functionality, allowing designers to incorporate lightweight ergonomic features without any restrictions. |
This technique directly addresses the issue of deformation in fragile parts. It allows for the successful manufacture of difficult designs through the integration of custom-made tools with unique process controls for specialized CNC turning. It is at the heart of our technical offering that enables customers to have clear guidance towards developing advanced and accurate sensor housing solutions.
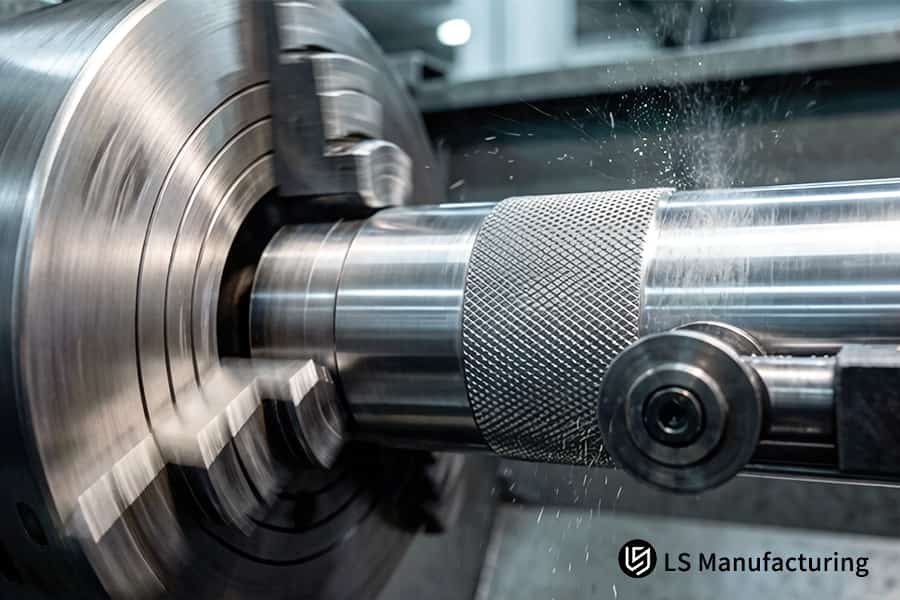
Figure 4: A CNC lathe performs specialized knurling processes on a shaft for improved grip on equipment levers.
How Can High Precision CNC Turning Reduce Overall Procurement Costs For Industrial Equipment Manufacturers?
In manufacturing processes for industrial machinery, there should be an effective procurement strategy that considers Total Cost of Ownership rather than focusing on unit price alone. One technique would be to integrate assemblies into a single component through the use of high precision CNC turning.
Part Consolidation via Advanced Geometrical Integration
Our cost optimization begins with a design analysis to identify sub-assemblies for integration. We utilize multi-axis CNC turning services to manufacture a single, complex part. This complex geometry CNC turning reduces component count by over 50%, eliminating assembly labor, fasteners, and inventory overhead. The result is a streamlined supply chain and a more reliable end product.
Process Streamlining and Guaranteed Precision
Consolidation is achieved in one setup, a core method for achieving precision. This eliminates cumulative tolerance errors from traditional assemblies. We use synchronized operations and live tooling for complete machining. This multi-axis turning solutions process minimizes work-in-process, reduces cycle time, and ensures repeatable, critical dimensional accuracy.
Embedded Traceability for Supply Chain De-risking
A sustainable savings program must not generate any new compliance issues. Each assembly will be serialized, with its complete manufacturing history embedded. The next generation of CNC machining technology ensures a non-alterable audit trail that transforms the component into a fully certified subsystem. Such an approach eliminates all supply chain risks and solidifies your procurement strategy in the future with guaranteed quality assurance.
Such an innovative approach allows the transformation of each assembly into a unique piece through integrated manufacturing and high precision CNC turning. Our expertise in dealing with complicated parts and supply chains provides our clients with a reliable subsystem. Cost optimization allows us to guarantee a proven technical and economic edge.
Case Study: LS Manufacturing Medical Titanium Surgical Handle Specialized Knurling Custom Solution
LS Manufacturing showcases its proficiency in engineering by resolving a demanding problem in the manufacture of a key medical component for an esteemed European OEM. This case study outlines how we successfully tackled the specialized knurling processes for the Ti-6Al-4V Grade 5 surgical handle with innovative engineering solutions and precision CNC turning services.
Client Challenge
The client faced serious manufacturing problems with their Ti-6Al-4V Grade 5 surgical scalpel handles. The initial knurling resulted in sharp crests, posing the problem of tearing gloves used for handling. Most importantly, the work-hardening nature of titanium during high-volume CNC turning posed severe tool wear and tear, leading to defective products exceeding 30% consistently.
LS Manufacturing Solution
Our solution incorporated multi-axis CNC turning in conjunction with a special “progressive-cut knurling” program. Custom-made diamond-coated tools were created to optimize feeds for a machined method. The controlled CNC knurling process and dedicated CNC turning systems created a micro-radius diamond texture without any edge sharpness, ensuring a required level of grip at 50N.
Results and Value
The high torque CNC turning in combination with our unique manufacturing process enabled a 99.8% first-pass yield rate. The tooling was very durable and helped cut down the price of molds per unit by 40%. Testing showed that 1000 simulated autoclave cycles did not affect the texture in any way, thus ensuring its durability. All of the above allowed LS Manufacturing to win a five-year contract for producing these handles.
This is just another example that showcases LS Manufacturing's expertise in providing engineered and turnkey production solutions to the toughest, material-dependent challenges. With the synergy created by advanced CNC turning solutions, unique process development, and empirical testing, LS Manufacturing transforms manufacturing issues into a competitive edge for our industrial clients.

FAQs
1. Why choose LS Manufacturing over standard CNC turning suppliers for knurled parts?
LS Manufacturing provides not only manufacturing services, but also the optimal design optimization through DFM with the help of precision cut knurling, resulting in parts within ±0.015mm tolerances.
2. What is the maximum material hardness supported by LS Manufacturing's specialized knurling processes?
The unique LS Manufacturing knurling machinery is capable of producing knurl marks in parts made from hardened steel having a maximum hardness rating of HRC 45.
3. How quickly can I receive a quote for precision CNC turning services for customized orders?
Just click the Get an Instant Quote button, and upload STEP or PDF files. In return, we will send you a detailed quote within 24 hours.
4. Does LS Manufacturing support small-batch or low-volume production for CNC-turned parts requiring knurling?
Sure, we do. We do not have rigid MOQs but try to work with you and optimize our process, thus helping you keep your cash flows healthy during the research and development phase.
5. How do you prevent thin-walled parts from deforming during CNC knurling operations?
We use customized internal expanding mandrels as well as dual-tool holder balancing to guarantee that ultra-thin wall components (0.5mm walls and below) do not experience any form of roundness error during the knurling procedure.
6. Can LS Manufacturing provide surface treatment reports for high-precision CNC-turned parts featuring knurling?
Certainly, we provide quality assurance reports based on ISO standards for free. This includes Ra surface finish, hardness, and salt spray testing at 720 hours.
7. What are the primary cost drivers for CNC turning operations involving complex knurling requirements?
Hardness of materials and knurling length are two of the key factors affecting processing costs, but through our effective turn-mill processes, you can enjoy savings of up to 20%.
8. Why is Cut Knurling superior to Form Knurling for precision metal parts?
Cut knurling doesn’t apply heavy radial force to the component, thus ensuring excellent concentricity and straightness.
Summary
In today’s competitive manufacturing world, finding a material and mechanical specialist becomes vital. By combining the knowledge in knurling and CNC turning technologies, LS Manufacturing can provide you with the parts with superior functionality and appearance at an affordable price. No matter what industry you represent, be it the medical field or the aerospace industry, our professional knowledge will give you a competitive advantage in the market.
Don’t allow your innovative ideas to suffer due to low-quality precision machining. Click on the “Get an Instant Quote” button below to upload your 3D files instantly. Our senior engineering team will present you with a highly cost-efficient manufacturing quotation along with a special “Part Functionality Optimization Proposal.” This offer is meant to ensure that your product will find its best place in the market where precision and cost-efficiency will come hand in hand.
📞Tel: +86 185 6675 9667
📧Email: info@lsrpf.com
🌐Website: https://lsrpf.com/
Disclaimer
The contents of this page are for informational purposes only. LS Manufacturing services There are no representations or warranties, express or implied, as to the accuracy, completeness or validity of the information. It should not be inferred that a third-party supplier or manufacturer will provide performance parameters, geometric tolerances, specific design characteristics, material quality and type or workmanship through the LS Manufacturing network. It's the buyer's responsibility. Require parts quotation Identify specific requirements for these sections.Please contact us for more information.
LS Manufacturing Team
LS Manufacturing is an industry-leading company. Focus on custom manufacturing solutions. We have over 20 years of experience with over 5,000 customers, and we focus on high precision CNC machining, Sheet metal manufacturing, 3D printing, Injection molding. Metal stamping,and other one-stop manufacturing services.
Our factory is equipped with over 100 state-of-the-art 5-axis machining centers, ISO 9001:2015 certified. We provide fast, efficient and high-quality manufacturing solutions to customers in more than 150 countries around the world. Whether it is small volume production or large-scale customization, we can meet your needs with the fastest delivery within 24 hours. choose LS Manufacturing. This means selection efficiency, quality and professionalism.
To learn more, visit our website:www.lsrpf.com.